
Heating System Control with a Raspberry Pi, Part 2: Wiring and Code, first version
With the Raspberry Pi and relay board secured, it’s time to make some things happen! Pictures in Part 1 showed the completed setup with wiring, but we’ll explain it in a little more detail here.
The programming goal for this initial stage is just to get this to the point where we can turn on heat in the office when we need it by logging into the Pi remotely via SSH, and issuing commands manually at the command line. More advanced functionality — temperature- and time-based control, and more, will (hopefully) come later as time allows.
To wire the relay board to the Pi and know which of the forty pins to choose, a GPIO pinout chart is essential. Credits to this link for the pinout shown below. There’s also a very well-done interactive pinout board diagram here; be sure to check that one out!
Note that in this diagram, the Pi’s orientation is such that the GPIO header is turned to the upper right corner; the network and USB ports are facing downwards.
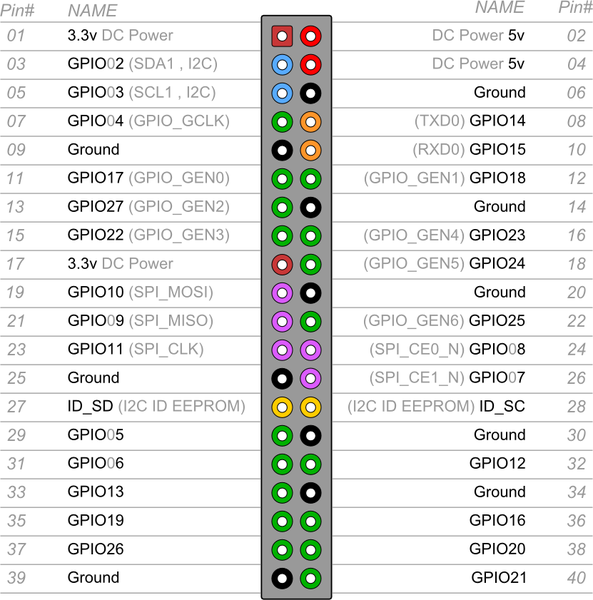
Pinout of Raspberry Pi boards with 40-pin GPIO
The relay board needs 5 volts DC; we’ll take that from pins 4 and 6 (positive and ground). I think I’ll power this with a separate 5V power supply eventually, just to be easier on the Pi. For now, I only need one relay but wired up two, just because why not; I hooked them to pins 11 and 12, which are labeled GPIO 17 and GPIO 18. I picked these more or less randomly; they’re close to the end of the board I’m pulling power from. It is trivial to change which pins are being used later, should we need to for any reason.
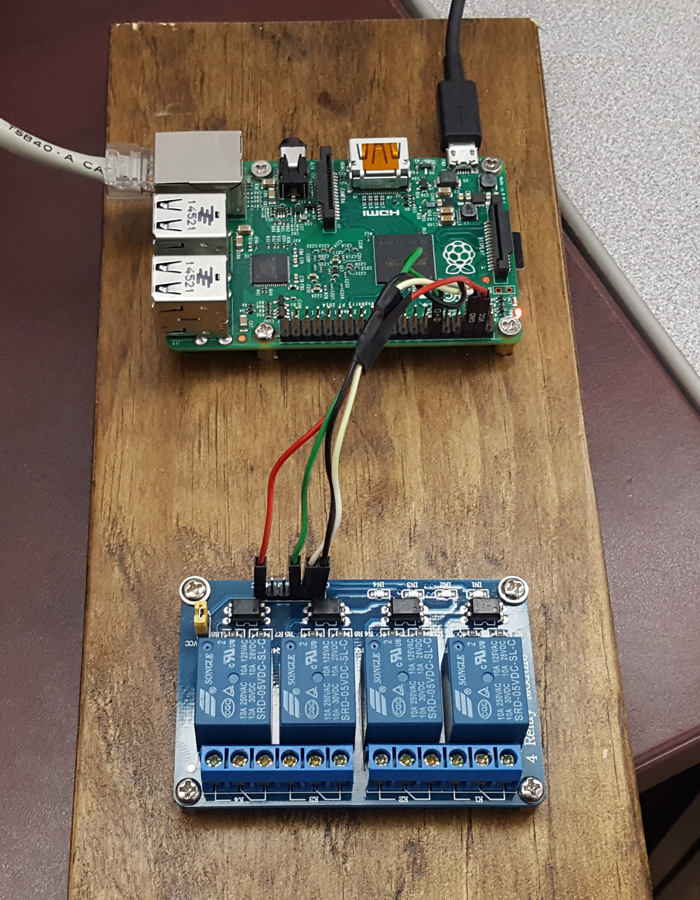
A closeup shot showing the wiring. GPIO 17 (pin 11) is connected to the header pin for the fourth relay on the right; GPIO 18 (pin 12) will control the third one. These are actually designated as # 1 and 2 on the board.
This setup will be fastened close to the NTI Trinity boiler, and will simply run the iLink pump controller, which in turn will send power to the pump and activate the furnace. I had these iLink controllers already, one for the house and one for the office; with this relay board, I could eliminate the iLink altogether and replace it with the Pi. However, it’s a cold winter and the quickest path to heat is the one we’ll take!

Heat is on! Note the red light on the relay board, the red light on the left iLink controller, and the water output temperature on the furnace: 165 degrees.
With the wiring out of the way, it’s time to write some Python to control the GPIO pins. There’s a handy Python GPIO library, RPi.GPIO, that we’ll rely on; and this library comes installed on Raspian so we don’t even have to install anything. Let’s get to work.
I experimented with a bare minimum of code first, in the python command line, just to see if I could turn the output pins on the Pi high (5V output) or low (0V output). The relay board I’m using requires its input pins to be High to turn the relays off, and Low to turn them on. This seems backwards, but it’s the way this board is designed. Be sure to check the documentation for your own board. With this working, I then wrote some basic code–no frills yet. In this test version, I’m going to cycle the relay on GPIO 17 on and off 3 times. The relay will remain on for 5 seconds, and off for 1 second. If this works out well, we’ll increase those timers so the furnace remains on for at least 20 minutes or so at a time. (I’m running the furnace in controlled on / off cycles simply because my office’s heat load is too small to keep the boiler busy indefinitely; if we heat constantly, after some time the temperature differential between the supply and return lines is so minimal that the propane boiler “short cycles.” To keep short cycling from happening, we give regular cool-down periods to allow the hot water in the floor pipes to cool a bit before calling for more heat. This is more work for future improvements: add some water temperature sensors for more intelligent control…)
# Import necessary modules
import RPi.GPIO as GPIO
import time

# Set up GPIO pins
GPIO.setmode(GPIO.BCM)
GPIO.setwarnings(False)
pins = [17,18]
for pin in pins:
    GPIO.setup(pin,GPIO.OUT)
    GPIO.output(pin,1)

# Set variables (change these to change heating cycles as desired)
runcycles = 3
ontime = 5
offtime = 1

# Run furnace on cycles specified above
cycle = 0

while cycle < runcycles:
    cycle += 1
    GPIO.output(17,0)
    print("Furnace turned on for %d seconds. Cycle %d of %d.") % (ontime, cycle, runycles)
    time.sleep(ontime)
    GPIO.output(17,1)
    if cycle == runcycles:
        break
    print("Furnace paused for %d seconds. %d heat cycles remaining.") % (offtime, runcycles - cycle)
    time.sleep(offtime)
    print("Heat cycles completed.")
My code explanations are written with minimal or no programming experience; so if you want to skip the wordy details, you can click here to skip past the entire explanation section.
If you are new to Python or to programming in general, note that any line beginning with # is a comment. This is strictly for human benefit; the Python interpreter completely ignores these lines. Comments help you know what you were thinking when you review your code later; they make it easier to find sections containing specific functionality; and they make your code more readable. So if you don’t have a habit of commenting code, or if you’re just beginning, cultivate the habit.
Line by line, here’s what’s happening. Import of necessary modules first…
import RPi.GPIO as GPIO: We need to import the GPIO module before we can use it. We import it with its name, RPi.GPIO (capitalizaion is important); but we don’t want to have to type out that whole clumsy name every time we use the module. So we import it as GPIO. This gives it an alias that we can use to refer to it; we can now call GPIO module simply by typing GPIO, instead of its longer proper name.
import time: Import the time module so we can run timers, to make things happen in intervals of seconds (more on this later)
GPIO.setmode(GPIO.BCM): Set the GPIO numbering mode to the BCM numbering scheme. If we’d choose the other option, GPIO.setmode(GPIO.BOARD) , then we’d use the “Pin number” rather than the “GPIO Number” in the schematic above. If you want to read more, this article explains it well.
GPIO.setwarnings(False): The very first time we initialize GPIO pins using GPIO.setup(), we will get no warnings because the pin is not setup and is open for new instructions. However, when we run the GPIO.setup() function on pins that have already been initialized, the GPIO module throws a warning that the pin is already in use. By ignoring these warnings, we get to quietly over-write any pin setup that exists. The other option would be to add the GPIO.cleanup() function just before the program exits so the script has a clean slate to start with each time; in some cases this probably would be a better choice, but for this project I want the pins to stay initialized between program runs so that the relay board keeps getting the High input it needs to keep the relay switched off.
pins = [17,18]: Initialize a Python list containing a list of the numbers of GPIO ports we want to initialize in the for loop that follows. For now we’re only going to work with pins 17 and 18 but in the future we can easily add more numbers to our list, or change them if needed.
for pin in pins: (etc): We’re running a for loop on our “pins” list. For each pin found in the list that we named pins, the program will do two things:
GPIO.setup(pin,GPIO.OUT): Tell the Raspberry Pi that we want it to initialize the pin to be used as an output.
GPIO.output(pin,1): The “1” designation is a shorter way to say GPIO.HIGH. 1 is High and 0 is Low. When this command is run, the pin begins putting out +5V.
runcycles, ontime, and offtime: These three variables will control the run behaviour. The while loop below these lines will use these variables to turn the relay on and off the specified number of cycles; the relay will remain on for the number of seconds specified, then turn off for the specified time before turning back on. For testing purposes we’ll make the script get done quickly; so we’ll turn on for five seconds, off for one second, etc, until we’ve completed three cycles.
cycle = 0: Initialize a variable to use as an iterator in the while loop below. We need a way to keep track of how many cycles have been completed.
while cycle < runcycles: This while loop should be fairly easy to follow through. If the number of run cycles completed is less than the number requested, the following is performed:
-
- Add 1 to the cycle iterator
- Set GPIO pin 17 Low to turn on the relay
- Print output to the terminal
- Sleep for the time specified in the “ontime” variable
- Set GPIO 17 High again to shut off the furnace
- If the number of heating cycles completed is equal to the number requested, exit (break) the while loop. Note that when this happens, we exit the while loop immediately without executing the code that follows below.
- Print information to the terminal regarding cycles completed and number still to go
- Sleep for the time prescribed in the “offtime” variable
print(“Heat cycles completed.”): This is printed to the terminal just before program exit.
Here’s a clip showing this code at work. It’s hard to describe the sense of satisfaction that comes from watching code do real physical work! Expand the view to be able to read code and terminal output.
It soon became obvious that this code needed some refining. For one thing, if I wanted to stop the script by pressing Ctrl C, I’d get the usual Python keyboard interrupt traceback — and if the heat was on when I hit Ctrl C, it would remain on because the GPIO pins remain in their High or Low state until commanded to do otherwise — and by interrupting the program during a heat run, heat would remain on indefinitely. I decided to add a try: except block that would shut down the heat and exit the script cleanly on a Ctrl C press. Also, instead of having to figure out how many seconds we want to have the furnace be on and off in each run cycle, why not enter minutes into those variables and have the computer figure out the sleep time seconds for us.
With those improvements, here’s the next version of the code. I won’t follow this with an explanation section; you should be able to fairly easily pick out the parts that are new.
# Import necessary modules
import RPi.GPIO as GPIO
import time

# Set up GPIO pins
GPIO.setmode(GPIO.BCM)
GPIO.setwarnings(False)
pins = [17,18]
for pin in pins:
    GPIO.setup(pin,GPIO.OUT)
    GPIO.output(pin,1)

# Set variables (change these to change behaviour as desired)
runcycles = 3
ontime = 40 # enter minutes here
offtime = 20 # enter minutes here

# Convert run times from minutes to seconds for sleep function
ontime *= 60
offtime *= 60

# Run furnace on cycle
cycle = 0

try:
    while cycle < runcycles:
        cycle += 1
        GPIO.output(17,0)
        print("Furnace turned on for %d seconds. Cycle %d of %d.") % (ontime, cycle, runcycles)
        time.sleep(ontime)
        GPIO.output(17,1)
        if cycle == runcycles:
            break
        print("Furnace paused for %d seconds. %d heat cycles remaining.") % (offtime, runcycles - cycle)
        time.sleep(offtime)

except KeyboardInterrupt: # if Ctrl C is pressed...
    GPIO.output(17,1) # shut off the boiler
    print("Program stopped and furnace shut off.") # print a clean exit message

print("Heat cycles completed.")
This worked very well during the fall when not a lot of heat was needed yet. With a simple “python start_furnace.py” a couple times through the day, the heating system would warm the floor enough to keep things cozy. When winter set in a little more earnestly though, we needed heat through the night also. I still haven’t had the time to get this running from a temperature sensor, so for now it’s cron to the rescue. We’ll just run some scheduled heating cycles through the night so the office is warm in the morning.
I copied the script above to a file named oneshot.py and modified it just a little so it only calls for one heat run 15 minutes long. Then I issued the “crontab -e” command and added these lines:
0 1,3,5,7,19,21,23 * * * /usr/bin/python /home/pi/furnace/oneshot.py
20 1,3,5,7,19,21,23 * * * /usr/bin/python /home/pi/furnace/stop_furnace.py
On the hours of 1, 3, 5, and 7:00 AM, and 7, 9, and 11:00 PM, the oneshot.py script is run. The second line is run 20 minutes past the hour on the same hours and is basically a “make double sure the furnace shuts off” measure. The “stop_furnace.py” script simply ensures that GPIO 17 is High, thereby shutting off heat. Just in case the “oneshot.py” script would hang and leave the furnace running, the stop_furnace script will shut it off. If the office is too cold in the morning, I can make a few simple adjustments to the script and the crontab entries to make the furnace run longer or run more often. I’m not going to take space to write about cron here; plenty of material exists about cron already and DuckDuckGo is your friend.
Much of this will become obsolete when we get a temperature sensor involved and figure out how to interface two Pi’s together. I’m not sure when that installment will be coming, because I’m busy… and warm! But though this system sure beats trekking up and down the steps to twist and un-twist wires together. it’s still not really that elegant and more tweaking has to happen sometime. Til next time, enjoy your Pi!


I enjoyed reading this. Learning comes by doing, I guess, but I’m learning a little myself watching someone else do the doing.
I’m curious why you use Python 2.7? Any strong arguments, or is that just what you’ve used, for no big reasons? I think the only part that wouldn’t work in Python 3 is the print functions with the %d variable references.
Hi Derek,
In many Linux distros, the default Python version is still 2.7. So, if you type “python” at the command line, in many cases you’ll get Python 2. To run version 3, the command is “python3.”
With Raspian the RPi module is already installed for Python 2.7, and I guess I didn’t even give it any thought. But thanks for commenting — today I ported my code to Python 3, and the only thing that needed a little bit of tweaking were the print statements. (I also had to install the python3-rpi module.) Look for a short article soon detailing the process of switching this little script over to Python 3 and getting it to run. Basically, Python 3 needs the entire print statement enclosed in parentheses; Python 2 didn’t require any parentheses for print statements but accepted them if they were there. So even if you’re working with Python 2 it’s a good idea to use parentheses in print statements because it helps ensure the code can be run under either version. When I wrote this code I was in Python3 mode when I put the first part of the print statement in parentheses… and in Python2 mode when I added the variable declarations I guess!