How To Install NextCloud 21 on Ubuntu Server 20.04 with Nginx, PHP-FPM, MariaDB, and Redis
This guide is for a manual install of NextCloud 21 on a fresh Ubuntu 20.04 server using Nginx, MariaDB, and PHP 7.4; and Redis for memcache.
1. Install Dependencies
First of all, install dependencies. Let’s start with Nginx (web server) and MariaDB (MySQL-equivalent database engine).
Note that I’m running commands shown below from a root prompt. If you’re not elevated to root, remember to use sudo for package install commands, etc.
apt update
apt install nginx mariadb-server
Now, PHP, Redis, and various modules.
apt install php7.4 php7.4-fpm php7.4-common php7.4-gd php7.4-curl php7.4-zip php7.4-xml php7.4-mbstring php7.4-intl php7.4-imap php7.4-bcmath php7.4-redis php7.4-mysql php7.4-gmp php7.4-imagick redis imagemagick
2. SQL Config and Database Creation
Secure the MariaDB server. Issue the following command, and follow the prompts. Set a root password for the SQL server, but otherwise accept all defaults.
mysql_secure_installation
Now, log into the mysql prompt and create a Nextcloud database and user. Replace the generic password shown below with one of your own, and record this. The commands below create a database and user, allow all privileges on the database to said user, apply the privilege changes, and exit the sql prompt.
mysql -u root -p

MariaDB [(none)]> CREATE DATABASE nextcloud;

MariaDB [(none)]> CREATE USER 'nextcloud'@'localhost' IDENTIFIED BY 'Your_Strong_Password';

MariaDB [(none)]> GRANT ALL ON nextcloud.* TO 'nextcloud'@'localhost' IDENTIFIED BY 'Your_Strong_Password';

MariaDB [(none)]> FLUSH PRIVILEGES;

MariaDB [(none)]> exit
3. Download and Unzip NextCloud
Visit the NextCloud Server Package Download page, and copy the link from the big blue “Download Nextcloud” button.
On your server, download the ZIP file using wget. (Obviously, replace the link shown below with whatever is current.)
wget 'https://download.nextcloud.com/server/releases/nextcloud-21.0.1.zip'
Install the unzip utility, and unzip the file. Move the unzipped folder to a web server directory, and set permissions and ownership.
apt install unzip
unzip nextcloud nextcloud-21.0.1.zip
mv nextcloud /var/www/
chown -R www-data:www-data /usr/share/nginx/nextcloud
4. Configure Nginx
Now, create an Nginx config file.
touch /etc/nginx/sites-available/nextcloud
Make changes to this config as necessary (change your server hostname, and ensure the path to the web application root directory is correct), and paste into the config file. Save and exit.
Note, below I am using the self-signed certs that come with Ubuntu so that Nginx can have all SSL config in place and reload without errors. We’ll grab a proper cert later from Letsencrypt.
upstream php-handler {
    #server 127.0.0.1:9000;
    server unix:/run/php/php7.4-fpm.sock;
}

server {
    listen 80;
    listen [::]:80;
    server_name cloud.example.com;

    # Enforce HTTPS
    return 301 https://$server_name$request_uri;
}

server {
    listen 443      ssl http2;
    listen [::]:443 ssl http2;
    server_name cloud.example.com;

    # Use Mozilla's guidelines for SSL/TLS settings
    # https://mozilla.github.io/server-side-tls/ssl-config-generator/
    ssl_certificate     /etc/ssl/certs/ssl-cert-snakeoil.pem;
    ssl_certificate_key /etc/ssl/private/ssl-cert/snakeoil.key;

    # HSTS settings
    # WARNING: Only add the preload option once you read about
    # the consequences in https://hstspreload.org/. This option
    # will add the domain to a hardcoded list that is shipped
    # in all major browsers and getting removed from this list
    # could take several months.
    #add_header Strict-Transport-Security "max-age=15768000; includeSubDomains; preload;" always;

    # set max upload size
    client_max_body_size 512M;
    fastcgi_buffers 64 4K;

    # Enable gzip but do not remove ETag headers
    gzip on;
    gzip_vary on;
    gzip_comp_level 4;
    gzip_min_length 256;
    gzip_proxied expired no-cache no-store private no_last_modified no_etag auth;
    gzip_types application/atom+xml application/javascript application/json application/ld+json application/manifest+json application/rss+xml application/vnd.geo+json application/vnd.ms-fontobject application/x-font-ttf application/x-web-app-manifest+json application/xhtml+xml application/xml font/opentype image/bmp image/svg+xml image/x-icon text/cache-manifest text/css text/plain text/vcard text/vnd.rim.location.xloc text/vtt text/x-component text/x-cross-domain-policy;

    # Pagespeed is not supported by Nextcloud, so if your server is built
    # with the `ngx_pagespeed` module, uncomment this line to disable it.
    #pagespeed off;

    # HTTP response headers borrowed from Nextcloud `.htaccess`
    add_header Referrer-Policy                      "no-referrer"   always;
    add_header X-Content-Type-Options               "nosniff"       always;
    add_header X-Download-Options                   "noopen"        always;
    add_header X-Frame-Options                      "SAMEORIGIN"    always;
    add_header X-Permitted-Cross-Domain-Policies    "none"          always;
    add_header X-Robots-Tag                         "none"          always;
    add_header X-XSS-Protection                     "1; mode=block" always;

    # Remove X-Powered-By, which is an information leak
    fastcgi_hide_header X-Powered-By;

    # Path to the root of your installation
    root /var/www/nextcloud;

    # Specify how to handle directories -- specifying `/index.php$request_uri`
    # here as the fallback means that Nginx always exhibits the desired behaviour
    # when a client requests a path that corresponds to a directory that exists
    # on the server. In particular, if that directory contains an index.php file,
    # that file is correctly served; if it doesn't, then the request is passed to
    # the front-end controller. This consistent behaviour means that we don't need
    # to specify custom rules for certain paths (e.g. images and other assets,
    # `/updater`, `/ocm-provider`, `/ocs-provider`), and thus
    # `try_files $uri $uri/ /index.php$request_uri`
    # always provides the desired behaviour.
    index index.php index.html /index.php$request_uri;

    # Rule borrowed from `.htaccess` to handle Microsoft DAV clients
    location = / {
        if ( $http_user_agent ~ ^DavClnt ) {
            return 302 /remote.php/webdav/$is_args$args;
        }
    }

    location = /robots.txt {
        allow all;
        log_not_found off;
        access_log off;
    }

    # Make a regex exception for `/.well-known` so that clients can still
    # access it despite the existence of the regex rule
    # `location ~ /(\.|autotest|...)` which would otherwise handle requests
    # for `/.well-known`.
    location ^~ /.well-known {
        # The rules in this block are an adaptation of the rules
        # in `.htaccess` that concern `/.well-known`.

        location = /.well-known/carddav { return 301 /remote.php/dav/; }
        location = /.well-known/caldav  { return 301 /remote.php/dav/; }

        location /.well-known/acme-challenge    { try_files $uri $uri/ =404; }
        location /.well-known/pki-validation    { try_files $uri $uri/ =404; }

        # Let Nextcloud's API for `/.well-known` URIs handle all other
        # requests by passing them to the front-end controller.
        return 301 /index.php$request_uri;
    }

    # Rules borrowed from `.htaccess` to hide certain paths from clients
    location ~ ^/(?:build|tests|config|lib|3rdparty|templates|data)(?:$|/)  { return 404; }
    location ~ ^/(?:\.|autotest|occ|issue|indie|db_|console)                { return 404; }

    # Ensure this block, which passes PHP files to the PHP process, is above the blocks
    # which handle static assets (as seen below). If this block is not declared first,
    # then Nginx will encounter an infinite rewriting loop when it prepends `/index.php`
    # to the URI, resulting in a HTTP 500 error response.
    location ~ \.php(?:$|/) {
        fastcgi_split_path_info ^(.+?\.php)(/.*)$;
        set $path_info $fastcgi_path_info;

        try_files $fastcgi_script_name =404;

        include fastcgi_params;
        fastcgi_param SCRIPT_FILENAME $document_root$fastcgi_script_name;
        fastcgi_param PATH_INFO $path_info;
        fastcgi_param HTTPS on;

        fastcgi_param modHeadersAvailable true;         # Avoid sending the security headers twice
        fastcgi_param front_controller_active true;     # Enable pretty urls
        fastcgi_pass php-handler;

        fastcgi_intercept_errors on;
        fastcgi_request_buffering off;
    }

    location ~ \.(?:css|js|svg|gif)$ {
        try_files $uri /index.php$request_uri;
        expires 6M;         # Cache-Control policy borrowed from `.htaccess`
        access_log off;     # Optional: Don't log access to assets
    }

    location ~ \.woff2?$ {
        try_files $uri /index.php$request_uri;
        expires 7d;         # Cache-Control policy borrowed from `.htaccess`
        access_log off;     # Optional: Don't log access to assets
    }

    # Rule borrowed from `.htaccess`
    location /remote {
        return 301 /remote.php$request_uri;
    }

    location / {
        try_files $uri $uri/ /index.php$request_uri;
    }
}
Create a symlink of this file in the Nginx “sites-enabled” directory to enable the website.
cd /etc/nginx/sites-enabled/
ln -s ../sites-available/nextcloud .
systemctl reload nginx
If Nginx does not reload without error, check for helpful messages by running “systemctl status nginx.” Correct issues as needed.
5. Run NextCloud Setup
If you are setting this up on your local network, you’ll want to add an A Record to your DNS server pointing your cloud server domain name to the IP address of your Nextcloud server. Depending on your network setup this might be done in your router, or in your Windows server if you have an Active Directory domain network configured. At this point, you should be able to access your “cloud.example.com” address in your browser, and set up NextCloud.
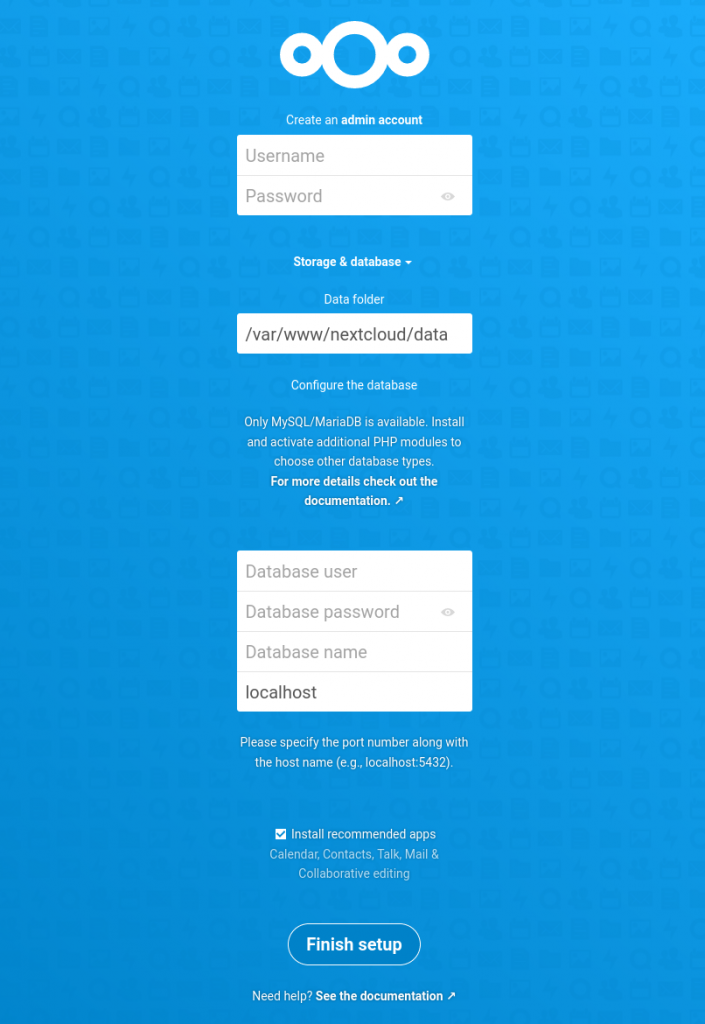
Specify an admin username and password as directed. The data directory is outside the scope of this basic article; if you want to store your data elsewhere you may, but if you are unsure, leave this at its default setting.
In the Database section, enter nextcloud as the database user and the password you specified during setup in the MySQL prompt. Enter nextcloud for database name, and leave the database set to its default value, localhost. Click on Finish Setup.
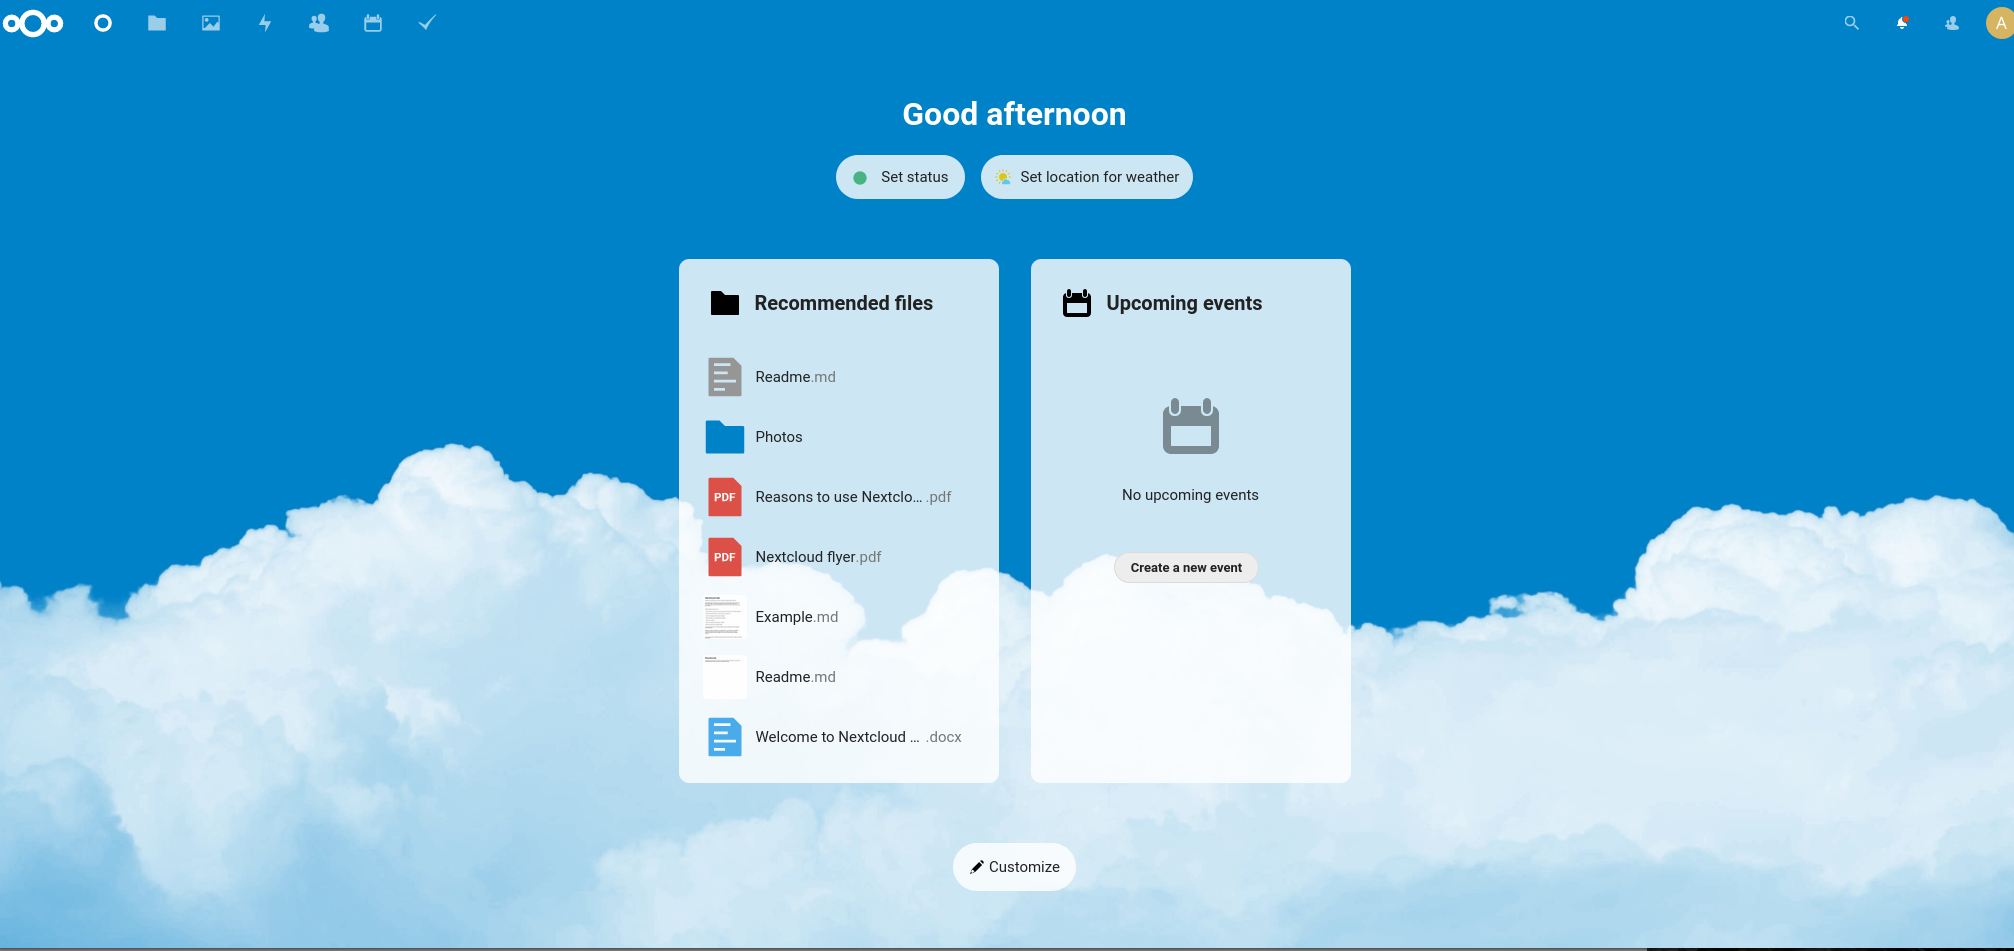
You should now have a minimal NextCloud setup! At this point it is functional, but we still need to do more tuning. First though, let’s get a certificate from LetsEncrypt.
6. Grab a free signed certificate from LetsEncrypt
Note that to obtain a LetsEncrypt certificate, Port 80 must be forwarded to your nextcloud server. (This also can be handled via a reverse proxy server, but we’re going to keep it simple for this article.) You should have 80 and 443 forwarded for external web access anyhow.
First, let’s install Certbot. I dislike having to install Snap as per the official certbot instructions, so let’s roll differently and install it as a normal package.
apt update
apt install certbot python3-certbot-nginx
Now, let’s grab a new cert from Letsencrypt. Use your custom nextcloud domain name where I show cloud.example.com.
certbot --nginx -d cloud.example.com
Go through the wizard. Provide an email address for certificate expiration notices; agree to the terms; decide whther or not you agree to data sharing. The certificate should be created and deployed automatically. At the end of the process you will be asked whether to reconfigure the web server to redirect all HTTP requests to HTTPS. You can safely select No here, as our Nginx config is already set up to do this.
Visit your NextCloud instance in your browser now, and verify the new certificate is in use.
7. Performance Tuning
In your shiny new NextCloud instance, click your user avatar in the upper right. From the dropdown, click Settings; then choose “Overview” under the Administration section. You will probably see something like this.
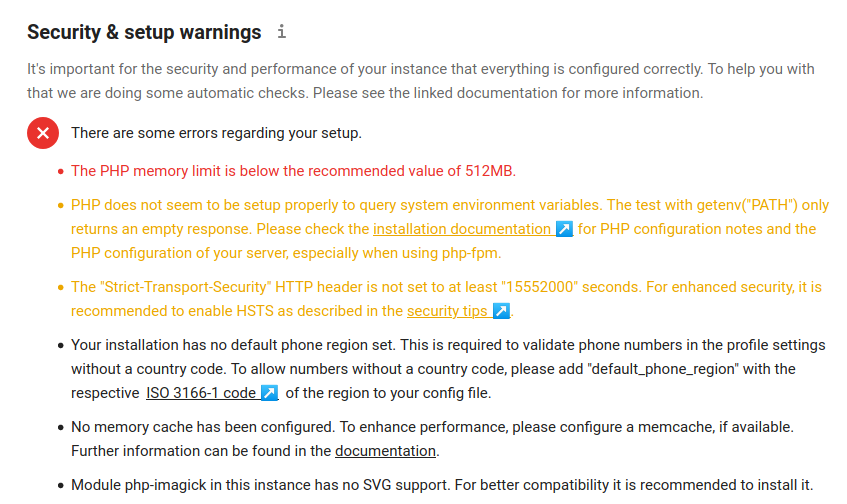
We will work through these errors one by one. Note that if you have installed all packages shown in the opening parts of this tutorial, you probably will not see the last error regarding imagemagick.
1. PHP Memory Limit
This is very easy to rectify. Open the file /etc/php/7.4/fpm/php.iniand search for memory_limit. Change the value from 128M to 512M.
; Maximum amount of memory a script may consume (128MB)
; http://php.net/memory-limit
memory_limit = 512M
2. PHP environment variable warnings
Edit fille /etc/php/7.4/fpm/pool.d/www.confand un-comment the folllowing lines. (to uncomment, erase the semicolon in front of each)
env[HOSTNAME] = $HOSTNAME
env[PATH] = /usr/local/bin:/usr/bin:/bin
env[TMP] = /tmp
env[TMPDIR] = /tmp
env[TEMP] = /tmp
3. Nginx HSTS
Edit file /etc/nginx/sites-enabled/nextcloudand uncomment the following line (delete the #)
add_header Strict-Transport-Security "max-age=15768000; includeSubDomains; preload;" always;
Let’s make our changes so far, effective.
systemctl restart nginx php7.4-fpm
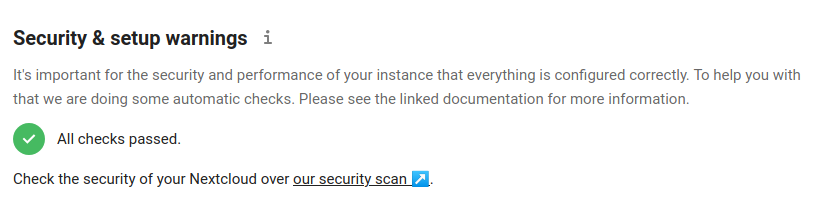
Refresh the NextCloud overview page and the top three errors should have gone away. Let’s tackle the rest of them…
4. No default region set
Add a line: ‘default_phone_region ‘ => ‘CA’, (if Canada) or ‘default_phone_region’ => ‘US’, (if United States, etc) to the file /var/www/nextcloud/config/config.php
For example, the bottom several lines of your config.php file might look like this when done. Remember the comma at the end of your newly-added line. If you do not know the two-letter abbreviation for your country, you can look it up here.
  'dbuser' => 'nextcloud',
  'dbpassword' => 'WhatAScaryOldPassword...',
  'installed' => true,
  'default_phone_region' => 'CA',
);
Save and close the file. You do not need to restart any services to make this take effect. If you refresh the Nextcloud page now, that error should be gone.
5. Configure memory caching
There are several options for caching; we’ll roll with Redis. If you carefully followed the guide so far, we already have the Redis server and PHP redis module installed. Add the following lines to your Nextcloud config.php file:
'filelocking.enabled' => true,
'memcache.locking' => '\OC\Memcache\Redis',
'memcache.local' => '\OC\Memcache\Redis',
'memcache.distributed' => '\OC\Memcache\Redis',
'redis' => array(
   'host' => 'localhost',
   'port' => 6379,
   'timeout' => 0.0,
   'password' => '',
    ),
In my case I added these just after the “trusted_domains” array but it’s not super important where in the file you place these settings. Save the file, refresh your Nextcloud page; and hopefully you’ll see something like this.
8. Additional Tweaks
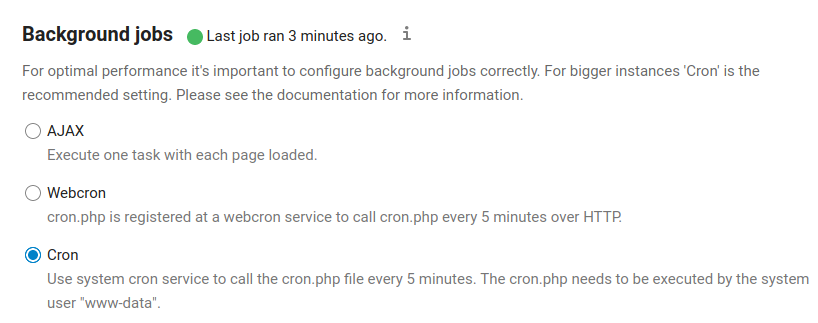
1. Configure a cron job
root@nextcloud:~# which php
/usr/bin/php
root@nextcloud:~# crontab -u www-data -e

# Add the following line to the end of the file: (will call the cron script every 5 minutes)
*/5  *  *  *  * /usr/bin/php -f /var/www/nextcloud/cron.php
With this done, change the setting to Cron within Nextcloud. Settings > Basic Settings.