Configuring DHCP Option 66 for VOIP phone auto provisioning
Recently I helped a client set up FreePBX Endpoint Manager. For the uninitiated, Endpoint Manager is a commercial plugin for FreePBX that allows automatic provisioning and configuration for supported VOIP endpoints. For a high-level overview in plain English, this allows you to configure phone settings from the PBX interface, then simply plug in your phone and power it up — and it will auto-magically configure itself and be ready for use: be connected to the phone server, assigned to the correct line, have BLF keys set up — the whole works. This can be extremely helpful in large installments where there are more than a handful of phones; instead of logging into each phone’s web interface individually, once your homework is done you basically plug phones in to your network, let them configure themselves, and then go ahead and start using them.
Of course, some configuration is needed before you just start plugging phones into your network. Without going into great detail on PBX setup, let’s just say that your PBX needs to support device management. (FreePBX supports it with the paid Endpoint Manager module; Wazo supports it natively.) If it does, then the process goes like this:
- Set up templates for phone config: set up BLF keys the way you want them, specify phone admin user and password as desired, etc
- Assign phone MAC addresses to extensions
- Plug in the phone and let the magic begin!
Obviously that’s a pretty general overview. But there’s one more piece of the puzzle that needs to be in place first for this all to come together, and that detail is the focus of this post. When you plug your VOIP phone into your network, how is it going to know which address to reach out to for instructions? In other words, how will it know where the PBX is? The answer lies in DHCP option 66. Option 66 allows you to specify the address of a TFTP server on your network, which is how Endpoint Manager serves configuration files to phones.
So basically you need to add a DHCP configuration setting specifying your PBX server’s IP address for option 66. Many routers should be able to support this, so check your documentation; or if you’re using a Linux-based router with dnsmasq, read on!
I recently configured DHCP option 66 on a ClearOS 7 gateway / firewall. If you’re not using ClearOS the file names shown below might be slightly different, but any Linux distro using dnsmasq as DHCP server should be very similar to this; so if you understand the concept, you should be able to adjust this as needed for your own router.
It turns out that the syntax for option 66 in dnsmasq is pretty simple. Suppose that your DHCP server is serving addresses on interface eth0 and your PBX’s IP address is 192.168.1.10. You would need to add a line to your DHCP configuration like this:
dhcp-option=eth0,66,192.168.1.10
Now, ClearOS’s DHCP settings are managed via its webconfig interface. Setting these DHCP options is not possible via the GUI (graphical user interface), so we need to head to the command prompt. (see “facepalm conslusion,” at the end of the page!) The dnsmasq config files are in the /etc/dnsmasq.d/ directory.
[root@system dnsmasq.d]# pwd
/etc/dnsmasq.d
[root@system dnsmasq.d]# ls
dhcp.conf  dnsmasq_domains
[root@system dnsmasq.d]#
Now, thedhcp.conf file is written by the web interface; so making changes here manually is not a good idea because they will be overwritten next time DHCP setting changes are made in the GUI. Feel free to view the file, though; you’ll see lines in there like so:
dhcp-option=ens18,1,255.255.255.0
dhcp-option=ens18,28,192.168.1.255
dhcp-option=ens18,3,192.168.1.1
dhcp-option=ens18,6,192.168.1.1
dhcp-range=ens18,192.168.1.100,192.168.1.254,12h
A casual observation of this file should reveal a few self-evident basics:
- We have a DHCP server enabled for interface “ens18”
- Gateway and DNS server (option 3 and 6) are both set to 192.168.1.1
- The DHCP lease scope is from 192.168.1.100 to 192.168.1.254 and lease time is 12 hours
From our look into the webconfig-generated file, we know the interface name is ens18. This knowledge will be useful shortly.
So, where to place a config file that will not be over-written by the ClearOS web-based settings panel? A quick look into /etc/dnsmasq.conf revealed this line:
conf-dir=/etc/dnsmasq.d
That tells us that configuration directives found in any file found in the /etc/dnsmasq.d/ directory will be included when the dnsmasq service starts. So all we need to do is create a file in that directory, giving it any name we wish, and place our custom DHCP option line in our new file.
In this case we’ll make a new file and just name it pbx.
cd /etc/dnsmasq.d/
touch pbx
Edit the file with your favorite command line editor (I prefer vim; if you’re newer to command line usage, use nano). We know from earlier exploration that the interface we are working with is “ens18.” The other piece of pertinent information is that the IP address of the FreePBX server is 192.168.1.90. So, this one line gets inserted into our newly created file:
dhcp-option=ens18,66,192.168.1.90
Save and close the file, then restart the dnsmasq service:
service dnsmasq restart
With this done, and your homework done on the PBX, you can power up your VOIP devices; and the DHCP server will tell them where to find the TFTP server. The phone then queries the TFTP server (your PBX) for further instructions; and the phone server’s endpoint manager responds by handing out the configuration file relevant to the MAC address of the device that’s requesting it. Your phone downloads the information and applies it — and, at least in the case of Yealink phones, reboots itself — and you’re good to go!
Conclusion
And now for a facepalm moment in conclusion. When nearly done writing this article, I went and checked out the ClearOS DHCP controls available in the GUI, because I was about to insert a line saying something to the effect that since this option can’t be set in the GUI, you need to do it manually at the command line. Well, ladies and gentlemen: behold…
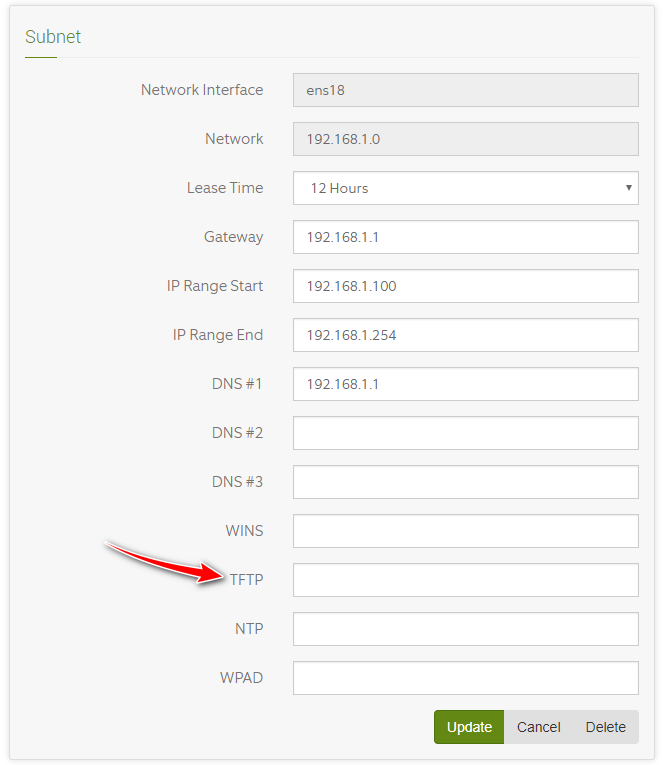
There’s a TFTP setting lurking (smirking?) in the ClearOS DHCP settings page!
All right, so a couple takeaways here. First of all (note to self), never presume anything! Second, if you run ClearOS, option 66 for TFTP server specification is right at your fingertips; so if command line navigation looks scary to you, or you don’t have root shell access, go ahead and sigh in relief. Third, little nuggets like this are fun to learn so I don’t regret at all that I took the long way around.
Since the information in this post may be helpful to someone, I’ll publish it even though it may seem a little superfluous. Till next time… keep learning!