
How to Install a custom Certificate Authority for the Linux Command Line
When using a Linux computer on a network filtered by a gateway / proxy doing SSL inspection, such as The Security Appliance, command line utilities that need to download secure web content often fail with security warnings. How can we ensure that your package manager (such as apt), wget, curl, and all the rest, behave nicely?
As it turns out, it’s not hard.
First, you’ll need a copy of the certificate you wish to install. If you are a Security Appliance user, you should know how to obtain a copy of the certificate. At the time of this writing however, there is no Linux-specific certificate download page in the log.cabin console; so just go grab it from the Firefox page; or from the Windows page, using Option #2 (the manual install link). If you’re using Firefox, you will need to right-click the badge and select Save As to download the certificate file to your computer instead of having Firefox pop up a dialog saying this is already installed as a trusted certificate authority.
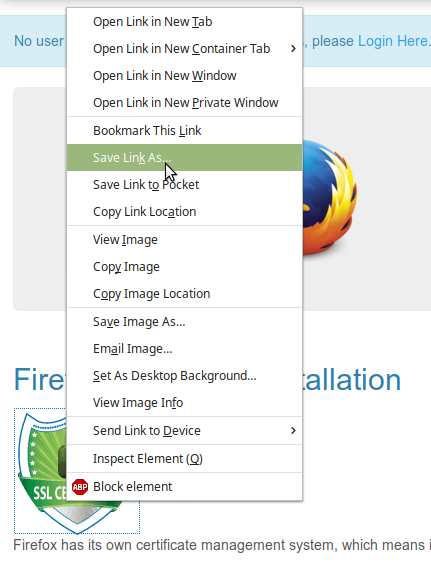
Here’s how you download a certificate file using Firefox.
In this case, the download file is in DER format. For import at the Linux command line, two things MUST be observed:
- The certificate needs to be in PEM format
- The file extension MUST be “.crt” . For example, a valid file name would be certificate.crt . If it’s certificate.pem, or any other extension, the certificate updater won’t recognize it.
You can check whether a file is PEM format or not by simply opening it with a text editor. You can do this at the command line, using vim or nano or whatever you like, or of course you can do it in the graphical interface, opening it with whatever text editor you happen to have installed. If you see a bunch of gibberish as below, the certificate is not PEM format.
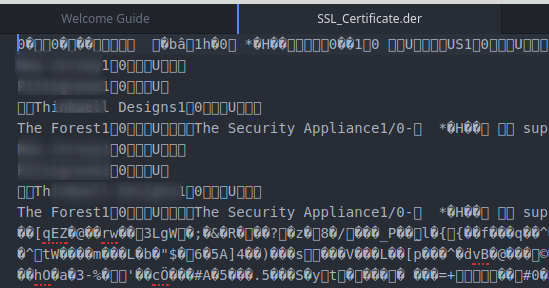
You know this isn’t PEM format!
Fire up a terminal, and cd to the directory where the certificate is; then run this command, replacing the file names as necessary.
openssl x509 -inform der -in SSL_Certificate.der -out SSL_Certificate.crt
Now open the SSL_Certificate.crt file. You should see something like the following:
-----BEGIN CERTIFICATE-----
(thirty-some lines of random characters)
-----END CERTIFICATE-----
Now we need to move this certificate to the appropriate directory, and apply it.
For Debian-based systems (Ubuntu, Mint, and more):
Create a folder within the /usr/local/share/ca-certificates directory to store your custom certificate(s). We’ll name ours “extra.”
sudo mkdir /usr/local/share/ca-certificates/extra
Copy the certificate file to your newly created directory.
sudo cp SSL_Certificate.crt /usr/local/share/ca-certificates/extra/
Now, just update system certificates and you’re done.
sudo update-ca-certificates
You should see output similar to the following:
Updating certificates in /etc/ssl/certs...
1 added, 0 removed; done.
Running hooks in /etc/ca-certificates/update.d...

done.
done.
For RHEL / CentOS systems, and their derivatives:
- Follow the instructions above as far as ensuring you have a certificate in PEM format, and saved with the “.crt” extension.
- Copy the crt file to /etc/pki/ca-trust/source/anchors/
- Run the following command:
update-ca-trust
With your content filter’s certificate installed, command line utilities just work so much better. No longer do you have to specify “–no-check-certificate” options. No longer does an “apt update” spit out lines of certificate warnings. Enjoy!


Just a suggestion, feel free to disregard. Why don’t you add a Linux page to the Draw Bridge SSL install instructions and put these instructions on there.
[link redacted]