Migrating from Ubuntu ZFS + VirtualBox to Proxmox VE
A few years ago, I built a server for a client to host several virtual machines and manage a large storage pool for NAS duties, backup storage, and so forth. At the time I chose Ubuntu Server 14.04 LTS as the host system, partly because I was familiar with Ubuntu Server but largely because Ubuntu supported ZFS more readily than other distros. For our storage needs I installed four 3 TB Western Digital Red hard drives and set up a RAIDZ2 array (so that any two drives could fail at once with no data loss) using ZFS for Ubuntu. Apparently ZFS is included in official Ubuntu repositories now, which is neat; I remember having to get it from a PPA. Anyhow, to get ZFS working, to understand its basics and set up my storage pools, I leaned heavily on the stellar documentaion provided by Aaron Toponce.
The Background & Reasons for Switching
Back then, I chose VirtualBox for my virtualization host, again because of familiarity and ease of use. To manage VirtualBox you need a GUI, so I installed LXDE on the Ubuntu server for a basic, lightweight graphical interface. When I built the server I’d chosen a SuperMicro motherboard with IPMI, so I could manage this server from anywhere on the network just as if I was physically sitting in front of it.
Overall, this system worked well and did what it was supposed to; but as time went various factors made me re-think my strategy and wish to do it over. For one thing, for some reason I never got to the bottom of, my Ubuntu host system would randomly reboot. This was frustrating and quite annoying, because when it went down for a reboot, all five of the virtual machines it hosted went down with it of course. My mail server, my PBX, and several other hosts were suddenly unavailable while the system rebooted–and this could be any hour of the day or night. Time between unwanted reboots might be three days or three weeks. Normally the virtual machines would come back up on their own, but not always; and the server had an uncanny way of choosing the most inopportune times to throw trouble. (Usually when I was gone with my family on a trip, or was out of the office for the day and supposed to be doing something other than computer work!) Once there must have been a kernel update that had failed to run the necessary ZFS module updates, and after one of these random reboots when the host came up the zpool was unavailable. I had to reboot and select an older kernel to get things going again. Talk about intense pressure followed by intense relief! So I grew tired of the need to babysit the server, never knowing when it would choose reboot out of the clear blue sky and need a little bit of attention.
It also seemed a little silly to run a complete operating system just to act as a host for other machines… I wanted a live backup copy of the entire server that I could swap over to should I ever need to… I wanted a way to reliably back up my virtual machines, able to quickly spin up a backup copy of any machine in the event of hardware or data disaster… Although all of this could probably be done with hours of package installing and config file editing (not to mention heaps of hours on DuckDuckGo, forums, and wikis), I don’t have a lot of spare time to fiddle with something like this and it just needs to work reliably. I started to want a web-based GUI to manage my storage pools, VMs, snapshots, replication, and more. Proxmox seemed a perfect fit.
But what kind of job might it be to migrate several terabytes of data and about half a dozen virtual machines from Ubuntu / VirtualBox to Proxmox? Like any other jobs, it’s one step at a time: and like any job in IT, it’s all about being careful not to burn any bridges so if anything blows up you can go back to previous configuration while designing a better migration strategy. When things don’t work out as planned, being able to revert quickly to former config and try again is an inexpressible stress-reliever!
The migration process
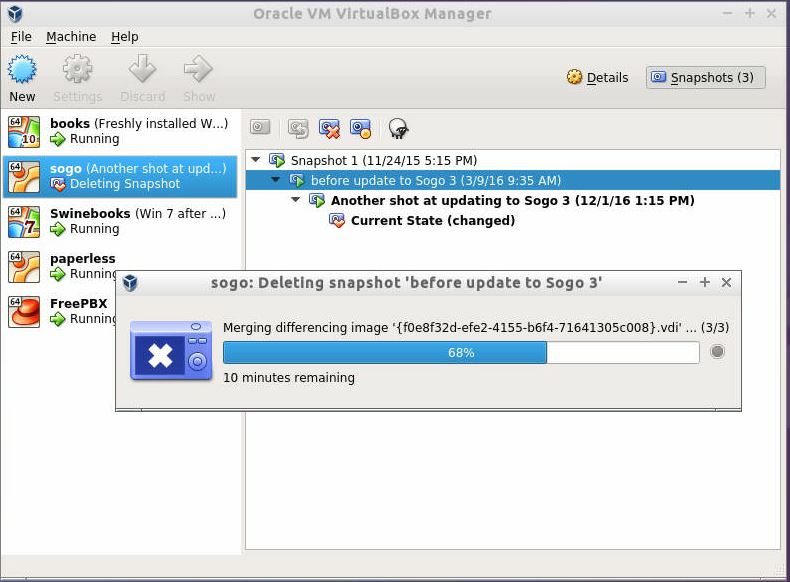
- First, I deleted VirtualBox virtual machine snapshots so the virtual hard drive files would be contained in one file instead of spread across several files; when we go to convert the VDI files to a format compatible with Proxmox later, we’ll want them to be just one file rather than spread out across several differencing images. To do this, select a virtual machine and click the Snapshots button; select one snapshot at a time and click the Delete button in the toolbar. According to this thread it does not matter in what order you delete snapshots, although it may be quicker to start at the bottom first. (Not sure if “bottom” means oldest first, or if it literally means “bottom of the list.”) Merging the differencing images can take quite some time, so be patient here — and find somthing else to do while you wait.
- Just to be safe, I backed up the entire ZFS volume to another machine. This took several hours to complete, and took a lot of space on the target machine; but I was paranoid about losing data.
- Now it was time to export the zpool and shut down the Ubuntu server.. Exporting basically closes all read-write operations cleanly and disconnects the pool from the system so it can be imported to another host later. This article provides excellent insights on ZFS export and import. I’d never physically moved a ZFS volume from one server to another, and was a little nervous about it. My zfs pool is called “cavern” so I ran this command:
zpool export cavern
I got a message complaining that one of the filesystems in the pool could not be umounted; ZFS refused to export the volume. I tried the -f flag to force the export with no better success. Not sure how else to get the volume free for unmounting, I rebooted the server, immediately logged in, and tried “zpool exoprt cavern” again; this time it worked. Running “zfs list” now showed no active zfs pools.
- With all this done, it was time to install Proxmox. I shut down the server and installed a fresh SSD for the system drive so I could quickly go back to Ubuntu with a simple hard drive swap just in case anything went sour — remember, don’t burn bridges! — and installed Proxmox from USB stick. The installation itself went very smoothly and quickly, except for an issue with the graphical installer not liking the SuperMicro VGA: the Proxmox VE installer showed the license terms and an Abort button, but the right side of the screen, where the Accept / Next / Continue buttons were supposed to be, was cut off; so it was impossible to click through the installer. This had me stumped until I found a tip in the Proxmox forums: use Alt + N for next, etc. N didn’t work at the license screen so I punched buttons until it did proceed. I tried Alt + O for OK; Alt + Y for Yes; Alt + C for Accept (A is already used for Abort, so avoid that one!). I forget which one actually did the trick, but after the license terms were agreed to, Alt + N advanced me through the installer. Enough of the screen showed that I was able to select time zone and a few other pertinent details. The install went very quickly and as a final step, the system needed to be rebooted (I think Alt + R did the job this time).
- Moment of truth: Can we import the zpool? After reboot, I logged in at the terminal with username root and the password I had specified during install. This command completed almost instantly:
zfs import cavern
No errors! Can it really be this easy? Let’s see what’s up:
zfs list
And–beautiful sight–there was the zpool, just as it had been on the Ubuntu system. The various file systems were in place; the pool was mounted at /cavern just as it had been under Ubuntu. That quickly, the entire ZFS volume was active on the new operating system, all files completely intact. Apparently moving a ZFS volume is easier than moving a hard drive and mounting it on another machine. Very impressive!
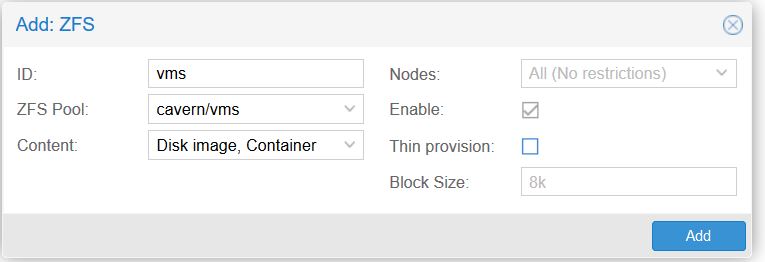
- To make our ZFS storage accessible to Proxmox, we need to add it in the GUI. Using a web browser from a workstation on the network, direct an HTTPS request over port 8006 to the Proxmox server IP address. For example, if your Proxmox host is assigned an IP address of 192.168.5.200, your address would look like this:
https://192.168.5.200:8006
Continue past the self-signed certificate warning, and log in with username “root” and the password specified during setup. Select “Datacenter” in the left column, then click the Storage tab to the right of that; in the toolbar, click the Add dropdown and select ZFS. Give the new storage a descriptive ID (I’ll call mine “vms,” and select the ZFS pool you want to use.
I also purchased a license and applied it. This is not hard to figure out and once your license key has been emailed to you, it is easily applied by clicking on the Proxmox host (the node under “Datacenter” in the tree on the left), and then clicking the Subscription tab; then click Upload Subscription Key.
With Proxmox running and our ZFS volume accessible, it’s time to create virtual machines and import the VirtualBox image files. That will be the scope of the next Proxmox article, coming soon.