How to Use Proxmox Mail Gateway with an Authenticated Smarthost
The Proxmox email gateway GUI allows you to set a non-authenticated smarthost.
I’ve been using the excellent Proxmox mail gateway to filter spam for our CareTech email server. Since I haven’t decided, yet, to pay our ISP their monthly charge for a static IP address, I can not send mail directly and have to relay through a smarthost. The Proxmox Mail Gateway interface allows you to set a smarthost but offers no provision for relaying with SMTP authentication. If you need to authenticate with your smart host, you’ll need to spend some time with the command line. Let’s get started.
1. Let’s take care of software dependencies first. You need to install a SASL library that’s not included by default; if you skip this step, you’ll see errors in your Postfix log and authentication will fail. Update software package information, and then install “libsasl2-modules.”
apt-get update
apt-get install libsasl2-modules
2. Change to the /etc/postfix/ directory and create a file to store the hostname, username, and password of your relay host; and set secure permissions on the file. It doesn’t matter what you name the file; just use a name that makes sense to you. I’ve chosen to call it “relay_passwd.”
cd /etc/postfix
touch relay_passwd
chmod 0600 relay_passwd
3. Edit the file using your favourite command-line editor, and enter just one line in precisely this format (replacing your relay server, port number, username, and password with your own information):
[smtp.example.com]:587 username:password
4. Save and close the file. Then, hash the newly created password file to make a db file Postfix can use:
postmap relay_passwd
5. Make a backup copy of your main.cf file in case you mess things up and need to restore known-good configuration. I like to date-stamp my configuration file backups, like so. Replace with today’s date.
cp main.cf main.cf.2018-10-06
6. Edit main.cf and add the following lines. Again, replace the “smtp.example.com” host name with the actual host name of your smart host; use the correct port number; and pay attention to the file name.
relayhost=[smtp.example.com]:587
smtp_use_tls = yes
smtp_sasl_auth_enable = yes
smtp_sasl_password_maps = hash:/etc/postfix/relay_passwd
smtp_sasl_security_options =
7. Restart Postfix, and test your new configuration.
systemctl restart postfix
8. Does it work? Great! Now, note that the main.cf file is written by the Proxmox web interface and the next time you make settings changes in the web interface affecting Postfix config, the lines you just added will be over-written and lost. To make this change permanent, you’ll need to edit the main.cf template file. Change to the /var/lib/pmg/templates directory and edit the main.cf file there, making exactly the same edits you made to the /etc/postfix/main/cf file. This will ensure that next time Proxmox writes out config file changes, it will include your custom lines and your authenticated smarthost relay will keep on working.
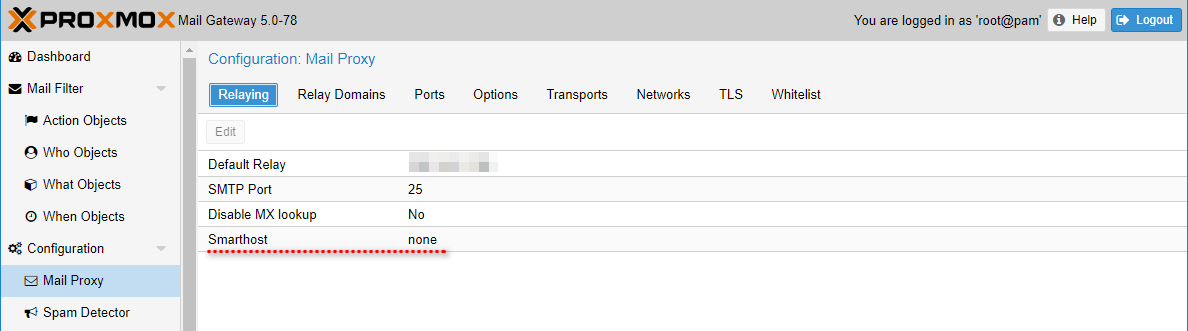
Not working? Check postfix logs for clues, and use your good friend DuckDuckGo for assistance. Also, ensure that you have the Smarthost option in the PMG interface set to None so you don’t get any configuration conflicts. Happy mail relaying!